

PART-B
Program 1: Create a Web Application to Perform Simple Login Page using Database Connectivity
Video:
Step 1: Creating
a New Web Application


Step 2: Add Web Form
for the empty website application
Website -----àAdd New Item -> WebForm
The default web form
name is Default.aspx
Step 3: Design
Page[Default.aspx]
Source Code[Default.aspx]
[Just for Reference to check the properties of ASP.NET
Controls]
Step 4 : Adding
the Database to the Program.
This also same
procedure like how we added the web form
Website --à Add New Item -àSQL Server Database
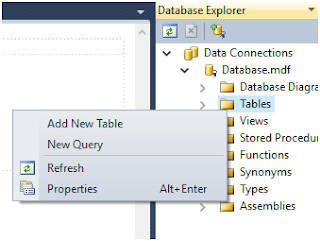
For Creating
Tables in the database first You have to select the Database Explorer
You have Select Tables Folder then right-click and
Select Add New table

Then Add Table Columns and its Data Types
For the UserId Column You have to Specify the Identity Specification(“An Identity column is a unique column that can
create a numeric sequence for you based on Identity Seed and Identity Increment”) to Yes. By
default it is No.
After Specifying
all the Columns and DataTypes Press Ctrl+S
to save the table with its Name Here it is UserInformation.
After Successful
Creation of Table in Database It will looks like this:
Step 5: We
require Connection String to Obtain the connection between the Front-end
Application with Back-end.
Click the Configure Data Source
Then no need to
go to Next Button. You click the cancel Button.
Step 6: Adding
Connection String in Web.config file
After typing
this go to Default.aspx.cs its code
page

Code for Login Button
If the values
inserted successfully to the database then it will redirect to the page Details.aspx Page
Output
For Running the Application Debug-à
Start Debugging or Ctrl+F5


Post a Comment