


Step 2: Add Web Form for the empty website application
Website -----àAdd New Item -> WebForm
The default web form name is Default.aspx


Step 3: Adding the Database to the Program.
This also same procedure like how we added the web form
Website --à Add New Item -àSQL Server Database

For Creating Tables in the database first You have to select the Database Explorer

You have Select Tables Folder then right-click and Select Add New table

Then Add Table Columns and its Data Types
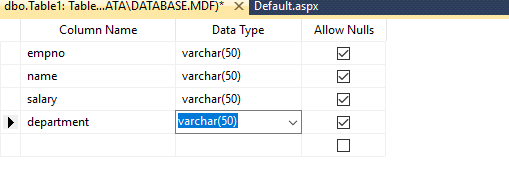

After Specifying all the Columns and DataTypes Press Ctrl+S to save the table with its Name Here it is employee.
After Successful Creation of Table in Database It will looks like this:

Step 4: In this Program there will 4 Webforms1. Default.aspx
2. addemployee.aspx
3. displayemployee.aspx
4. department.aspx
1. Default.aspx[Design]

Default.aspx.cs[Code file]

1.2 To obtain the prompt box
You have to select the department button then go to properties window.

2. addemployee.aspx[Design]

addemployee.aspx.cs[code]

displayemployee.aspx[Design]

Here we want to connect gridview with SqlDataSource

Click the Configure Data Source

Keep on clicking next then click Finish Button.
The connection between GridView and SqlDataSOurce has been initiated.
The connection between GridView and SqlDataSOurce has been initiated.
displayemployee.aspx.cs
There is no coding for this page
3. department.aspx


Step 5: Output
When running main Page[Default.aspx]

Note: We have a Hidden Field in the Form But it will not display while displaying the form.
addemployee page

displayemployee page

When You are clicking the department button prompt box should popup

Only the filtered records will be displayed


0 Comments